In one of our production clusters, we’ve faced the issue of depleting the IP addresses, due to how ENI assigns and reserves IP addresses. You can check out ENI Max Pods for the numbers.
The most obvious choice is to use a different CNI plugin for the EKS, with Calico being the most popular one.
However, it was not an easy task, as:
- AWS Calico guide only uses Calico as a Network Policy engine. It’s also pretty confusing with all those Helm deprecation notes. Furthermore, it just doesn’t work for me from the box.
- Calico Getting Started on EKS
the guide is much better, but still, it lacks a few important steps and requires
you to create a new EKS via
eksctl
Due to this, I’ve decided to write this post, summarizing my experience with
Calico. I’ll show how to deploy Calico as CNI plugin to the existing cluster, with
VXLANCrossSubnet for Pods communicating between the nodes.
Prerequisites
- A running EKS cluster.
- AWS CNI is used.
Installation
Remove aws-node daemon set to disable AWS VPC.
kubectl delete daemonset -n kube-system aws-nodePlease be aware that if your cluster was created through the web interface, you’ll
probably have AWS CNI add-on enabled. Due to this, it will recreate aws-node
daemonset automatically.
You can disable the AWS CNI plugin through the web interface or by running:
aws eks delete-addon --cluster-name eks-cluster --addon-name vpc-cni --preserveAllow required ports in the node security group.
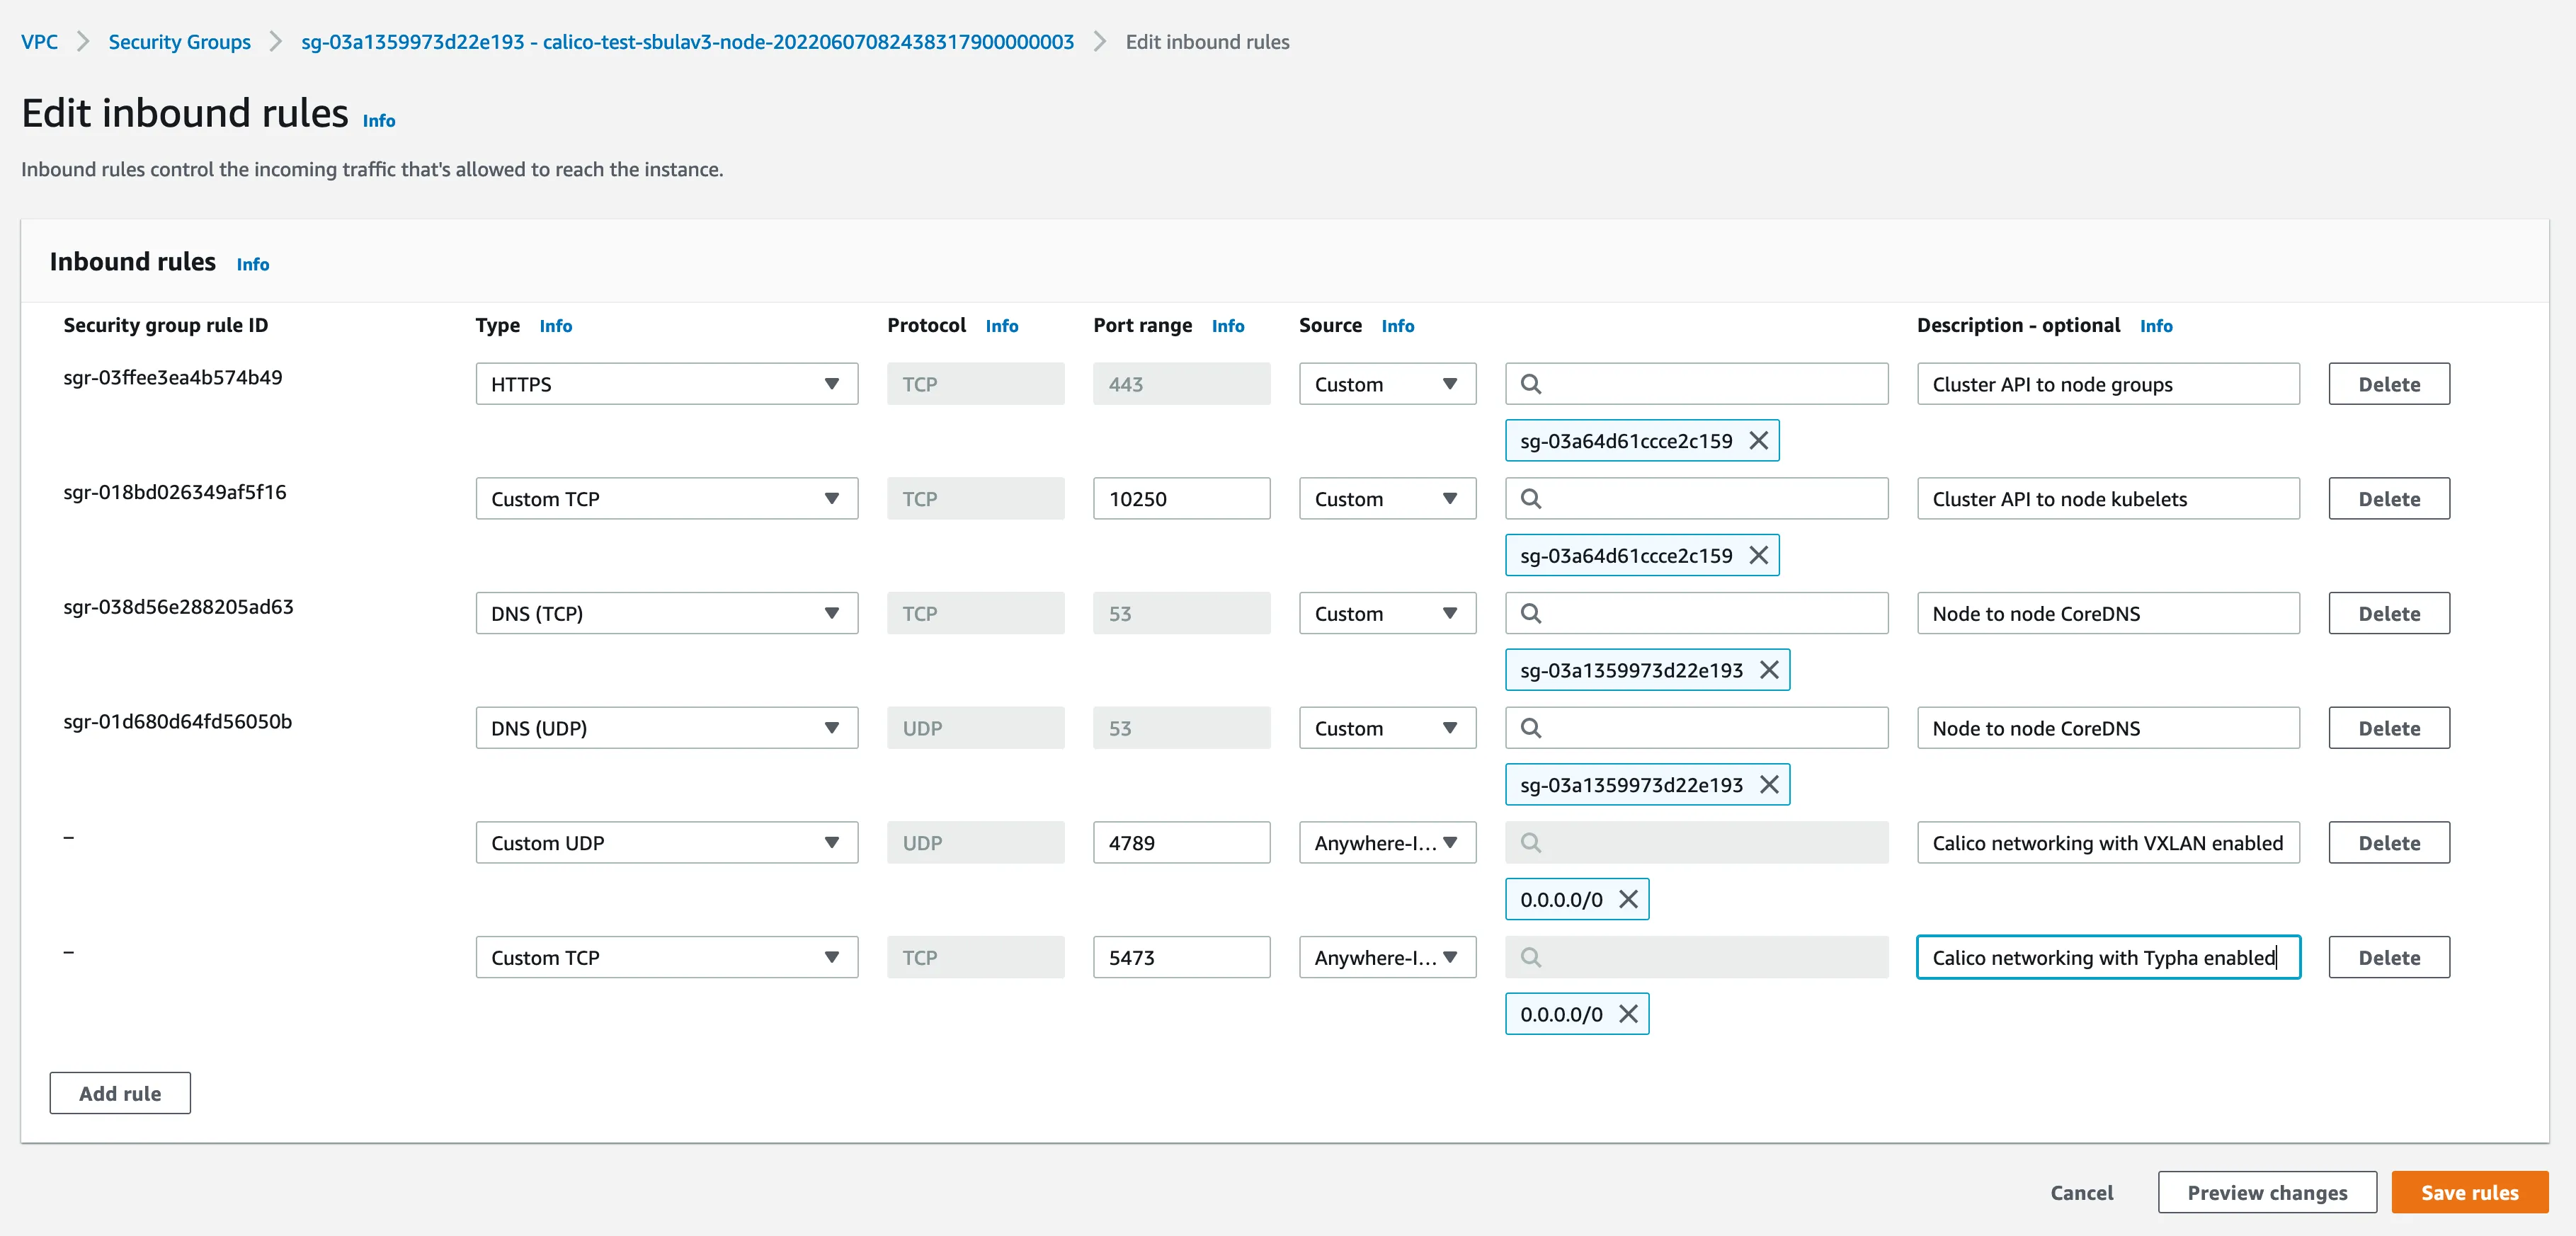
For unknown to me reason, opening ports is not mentioned in the Calico EKS guide, but without those ports, Calico components will not work. You can check all Calico prerequisites on this page: Calico Prerequisites
For VXLAN, the following ports are required(!Rules have to be added to the node security groups, not to the cluster SGs):
- UDP 4789 Incoming and Outgoing
- TCP 5473 Incoming(Though documentation says that only incoming ports are required,
I had to open the outgoing port as well to make
aws-nodework)
Install the Operator
kubectl create -f https://projectcalico.docs.tigera.io/manifests/tigera-operator.yamlNotice that Calico operator is using image quay.io/tigera/operator:v1.27.1,
so you might need to allow traffic to this registry.
Create Calico installation
Installation CRD will describe to the operator how it should configure Calico, i.e. should it deploy CNI or just work with network policy, which IP pool to use and how to configure communication between the Pods.
kind: Installation
apiVersion: operator.tigera.io/v1
metadata:
  name: default
spec:
  kubernetesProvider: EKS
  registry: quay.io
  cni:
    type: Calico
  calicoNetwork:
    bgp: Disabled
    ipPools:
      - cidr: 172.16.0.0/16
        encapsulation: VXLANCrossSubnet
In this yaml, there are a few parameters that I’d like to clarify:
registry: quay.io- For me, all requests to the Docker registry were rate limited. Since Calico maintains a fully functional repository in thequay.ioregistry, it makes sense to use it instead of Docker Hub.encapsulation: VXLANCrossSubnet- for the Pods to be able to communicate with each other between the nodes, Overlay network must be used. Calico supports VXLAN and IPinIP encapsulation. By setting encapsulation to VXLANCrossSubnet, we perform encapsulation selectively, and only for traffic crossing subnet(node) boundaries.
Calico uses route aggregation to reduce the number of routes when possible. The /26 corresponds to the default block size that Calico IPAM (IP Address Management) allocates on-demand as nodes need pod IP addresses. (If desired, the block size can be configured in Calico IPAM settings.)
If nodes use all the IPs from the /26 block, an additional block will be allocated to the node.
Recreate all nodes in the node group
For calico-node to properly configure iptables, each node in the
cluster must be recreated. This can be done in a few ways:
- Remove the old node group and attach a new one
- Scale nodegroup to 0, wait for the termination, scale nodegroup back to the desired size.
- Manually terminate each instance in the node group.
Verify that Calico pods are up and running
kubectl get pods -n calico-system -o wide
calico-node: Calico-node runs on every Kubernetes cluster node as a DaemonSet. It is responsible for enforcing network policy, setting up routes on the nodes, plus managing any virtual interfaces for IPIP, VXLAN, or WireGuard.calico-typha:Typha is a stateful proxy for the Kubernetes API server. It’s used by every calico-node pod to query and watch Kubernetes resources without putting excessive load on the Kubernetes API server. The Tigera Operator automatically scales the number of Typha instances as the cluster size grows.calico-kube-controllers:Runs a variety of Calico specific controllers that automate synchronization of resources. For example, when a Kubernetes node is deleted, it tidies up any IP addresses or other Calico resources associated with the node.
Verify that Pods on different nodes can communicate with each other
Run a few busybox images which contain ping:
kubectl create deployment pingtest --image=quay.io/prometheus/busybox --replicas=3 -- sleep infinityPick two Pods running on different nodes and notice their IPs:
kubectl get pods -o wide
SSH into one Pod and ping another:
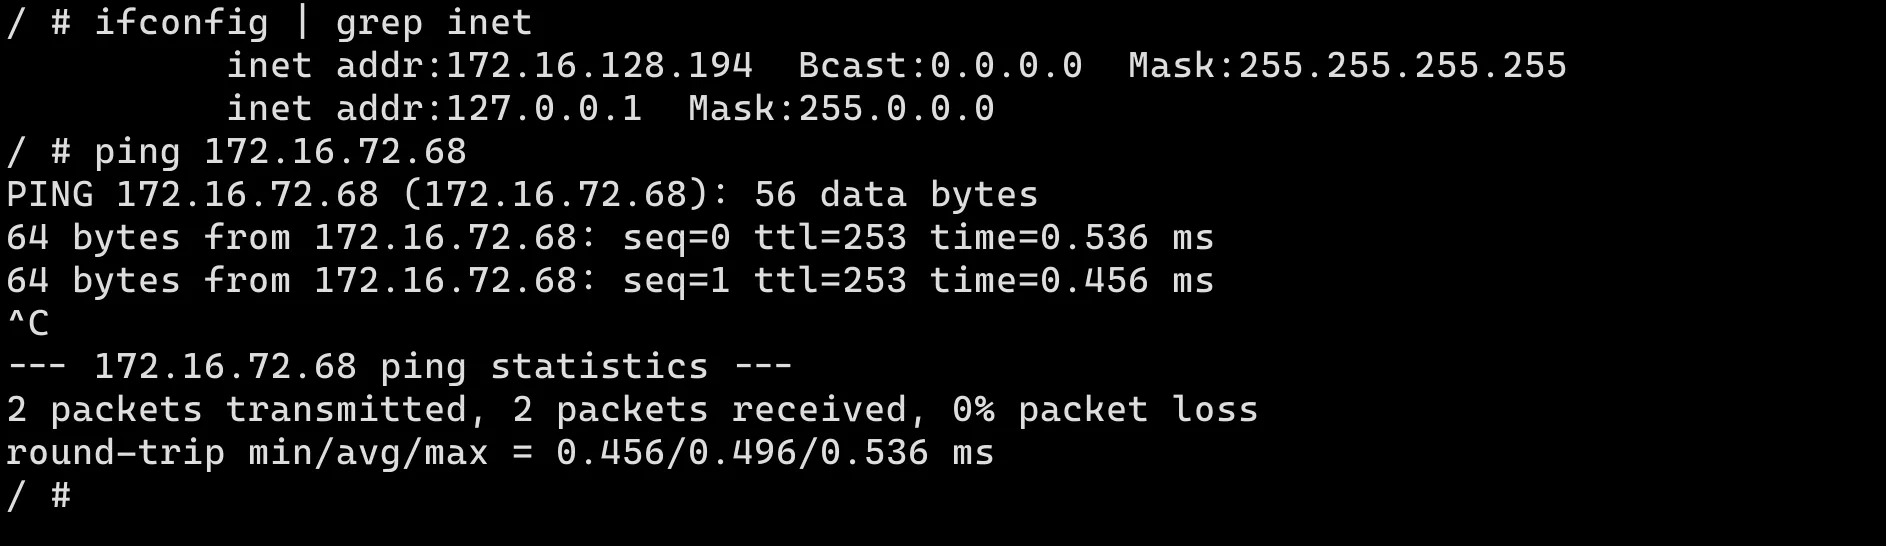
For me, this was sufficient, however, you might need to disable Source/Destination IP check
One of the Calico daemons, Felix, can do this automatically with awsSrcDstCheck set to Disable:
apiVersion: crd.projectcalico.org/v1
kind: FelixConfiguration
metadata:
  name: default
spec:
  awsSrcDstCheck: Disable
  bpfLogLevel: ""
  floatingIPs: Disabled
  healthPort: 9099
  logSeverityScreen: Info
  reportingInterval: 0s
Remove limitation of max pods per node
If needed, you can remove the limit of max pods per node by using EC2 bootstrap
script --use-max-pods to false.
To do this, modify the node group launch template and provide the following user data in the launch template:
/etc/eks/bootstrap.sh my-cluster \
  --use-max-pods false \
  --kubelet-extra-args '--max-pods=110'
For more info, check out CNI Increase IP addresses
Conclusion
If you plan to use Calico, I strongly recommend going through the Certified Calico Operator: Level 1 course by Tigera. It’s pretty short(a few hours), but does a good job explaining various aspects of Calico.
And as a bonus, you’ll receive a free CCO-L1 certification.
Calico is a great tool offering network policy, IP address management capabilities, and much more. Hopefully, this post made the installation of Calico a bit more clear.